NFT dApp
Description: This tutorial provides a comprehensive guide to building an NFT dApp using aelf's multi-token contract. It covers the entire process from creating NFT collections to generating non-fungible tokens and enabling seamless transfers between token holders on the aelf blockchain.
Purpose: The tutorial aims to introduce users to the world of NFTs on aelf by demonstrating the use of aelf's multi-token contract for creating NFT collections, minting unique tokens, and performing token transfers. This hands-on approach allows developers to explore and harness the power of aelf's decentralized infrastructure for NFT development.
Difficulty Level: Moderate
Step 1 - Setting up your development environment
- Local
- Codespaces
- Basic knowledge of terminal commands
- IDE - Install VS Code
Note for Apple Silicon users:
Ensure that Rosetta is installed, if it is not, use the following command:
softwareupdate --install-rosetta
Install Required Packages
- Install dotnet 8.0.x SDK
- Install aelf contract templates
- Linux and macOs
- Windows
dotnet new --install AElf.ContractTemplates
dotnet new install AElf.ContractTemplates
AELF.ContractTemplates contains various predefined templates for the ease of developing smart contracts on the aelf blockchain.
- Install aelf deploy tool
dotnet tool install --global aelf.deploy
aelf.deploy is a utility tool for deploying smart contracts on the aelf blockchain. Please remember to export PATH after installing aelf.deploy.
ℹ️ Note: If you have installed aelf.deploy and your terminal says that there is no such command available, please uninstall and install aelf.deploy.
Install Node.js and Yarn
Install aelf-command
- Linux and macOs
- Windows
sudo npm i -g aelf-command
npm i -g aelf-command
aelf-command is a CLI tool for interacting with the aelf blockchain, enabling tasks like creating wallets and managing transactions. Provide required permissions while installing aelf-command globally.
- Visit aelf-devcontainer-template.
- Click the
Use this templatebutton. ChooseCreate a new repository. - Enter a suitable repository name. Click
Create repository. - Within the GitHub interface of your new repository, click on
Code. SelectCodespaces. - Click on the
+sign to create a new Codespace. - After some time, your workspace will load with the contents of the repository. You can now continue your development using GitHub Codespaces.
Step 2 - Getting NFT Seed
In order to create an NFT collection on the aelf blockchain, the deployer wallet must have an NFT SEED.
- Visit NFT Faucet to get your NFT SEED.
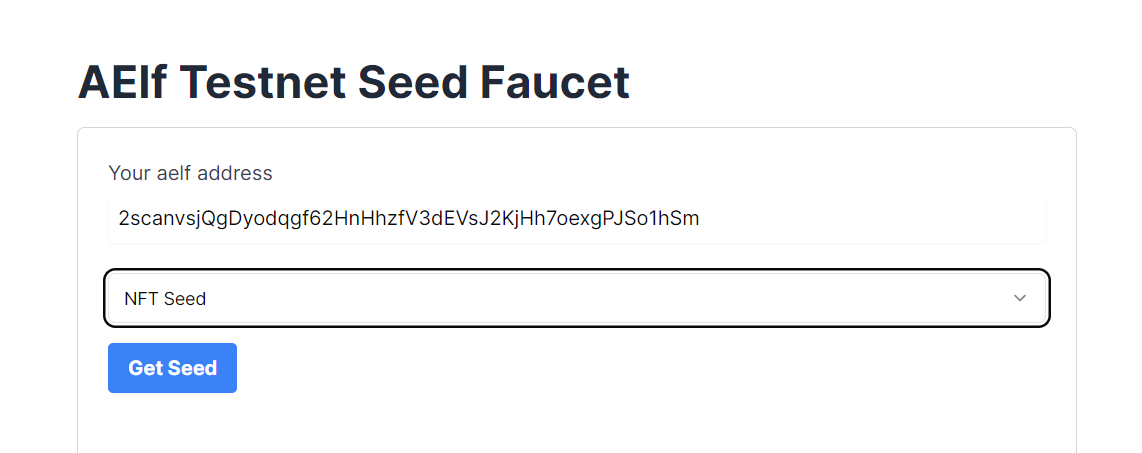
- After the request is successfully processed, the requestor wallet will receive the SEED.
- Please note this SEED symbol value, as it will be needed later while creating the NFT collection and NFT generation. This will become our Token Symbol.
Step 3 - Interact with aelf's multi-token contract
Project Setup
Let's start by cloning the frontend project repository from GitHub.
- Run the following command your Terminal:
git clone https://github.com/AElfProject/aelf-samples.git
- Next, navigate to the frontend project directory with this command:
cd aelf-samples/nft/2-dapp
- Once you're in the
2-dappdirectory, open the project with your preferred IDE (e.g., VSCode). You should see the project structure as shown below.
Install necessary packages and libraries
- Run teh following command in the terminal:
- Linux and macOs
- Windows
sudo npm install
npm install
We are now ready to build the frontend components of our NFT dApp.
Configure Portkey Provider & Write Connect Wallet Function
We'll set up our Portkey provider to allow users to connect their Portkey wallets to our app and interact with the aelf smart contracts. We'll be interacting with the already deployed multi-token contract for this tutorial.
Step 1. Locate the File:
- Go to the
src/hooks/useNFTSmartContract.tsfile.
Step 2. Fetch the Smart Contract:
-
Find the comment
//Step A - Function to fetch a smart contract based on the chain symbol and the contract address. -
Replace the existing
fetchContractfunction with this updated code:
//Step A - Function to fetch a smart contract based on the chain symbol and the contract address
const fetchContract = async (
  symbol: "AELF" | "tDVW",
  contractAddress: string
) => {
  try {
    // If no provider is available, return null
    if (!provider) return null;

    // Fetch the chain information using the provider
    const chain = await provider.getChain(symbol);
    if (!chain) throw new Error("Chain not found");

    // Get the smart contract instance from the chain
    const contract = chain.getContract(contractAddress);

    // Return the smart contract instance
    return contract;
  } catch (error) {
    console.error("Error in fetchContract", { symbol, contractAddress, error });
  }
};
Explanation:
-
fetchContractFunction: This function fetches a smart contract based on the given chain symbol (e.g., "AELF" or "tDVW") and the contract address.- Check Provider : If no provider is available, the function returns null.
- Fetch Chain : The function fetches chain information using the provider.
- Get Contract : It retrieves the smart contract instance from the chain.
- Error Handling : If an error occurs, it logs the error to the console.
Step 3. Initialize and Fetch the Smart Contracts:
-
Find the comment
// Step B - Effect hook to initialize and fetch the smart contracts when the provider changes. -
Replace the existing
useEffecthook with this updated code:
// Step B -  Effect hook to initialize and fetch the smart contracts when the provider changes
  useEffect(() => {
    (async () => {
      // Fetch the MainChain Testnet Contract
      const mainChainContract = await fetchContract(
        "AELF",
        "JRmBduh4nXWi1aXgdUsj5gJrzeZb2LxmrAbf7W99faZSvoAaE"
      );
      setMainChainSmartContract(mainChainContract as IContract);

      // Fetch the dAppChain Testnet Contract
      const sideChainContract = await fetchContract(
        "tDVW",
        "ASh2Wt7nSEmYqnGxPPzp4pnVDU4uhj1XW9Se5VeZcX2UDdyjx"
      );
      setSideChainSmartContract(sideChainContract as IContract);
    })();
  }, [provider]); // Dependency array ensures this runs when the provider changes
Explanation:
-
useEffectHook : This hook initializes and fetches the smart contracts when the provider changes.- Check Provider : If no provider is available, the function returns null.
- Fetch Contracts : It fetches and sets the smart contracts for the main chain, side chain, and cross chain.
- MainChain Contract : Fetches the MainChain Testnet Contract and sets it in the state.
- dAppChain Contract : Fetches the dAppChain Testnet Contract and sets it in the state.
By following these steps, we'll configure the Portkey provider to connect users' wallets to your app and interact with the multi-token smart contract including NFT related functionalities. This setup will enable our frontend components to perform actions like create NFTs, validate NFTs, and transfer NFTs.
Configure Connect Wallet Function
Step 1: Locate the File
- Go to the
src/components/layout/header/index.tsxfile.
Step 2: Write the Connect Wallet Function
-
The
header/index.tsxfile is the header of our NFT dApp. It allows users to connect their Portkey wallet with the NFT dApp. -
Before users can interact with the smart contract, we need to write the
Connect Walletfunction. -
Find the comment
// Step C - Connect Portkey Wallet. -
Replace the existing connect function with this code snippet:
const connect = async (walletProvider?: IPortkeyProvider) => {
  // Step C - Connect Portkey Wallet
  const accounts = await (walletProvider ? walletProvider : provider)?.request({
    method: MethodsBase.REQUEST_ACCOUNTS,
  });
  const account = accounts?.AELF && accounts?.AELF[0];
  if (account) {
    setCurrentWalletAddress(account.replace(/^ELF_/, "").replace(/_AELF$/, ""));
    setIsConnected(true);
  }
  !walletProvider && toast.success("Successfully connected");
};
Explanation:
-
connectFunction : This function connects the user's Portkey wallet with the dApp.- Fetch Accounts : It fetches the wallet accounts using the provider.
- Log Accounts : Logs the accounts to the console for debugging.
- Set Wallet Address : Sets the current wallet address state variable with the fetched account.
- Update Connection Status : Updates the state to indicate that the wallet is connected.
- User Notification : Displays an alert to notify the user that their wallet is successfully connected.
In this code, we fetch the Portkey wallet account using the provider and update the wallet address state variable. An alert notifies the user that their wallet is successfully connected.
With the Connect Wallet function defined, we're ready to write the remaining functions in the next steps.
Configure Create NFT Form Code
Step 1: Locate the File
- Go to the
src/pages/create-nft/index.tsxfile. This file is the Create NFTs page where users can enter details like thetokenName,symbol,totalSupplyanddecimals.
Step 2: Prepare Form to Create NFTs
-
Find the comment
// Step D - Configure NFT Form. -
Replace the form variable with this code snippet:
// Step D - Configure NFT Form
const form = useForm<z.infer<typeof formSchema>>({
  resolver: zodResolver(formSchema),
  defaultValues: {
    tokenName: "",
    symbol: "",
    totalSupply: "",
    decimals: "",
  },
});
Here's what the function does:
-
Initializes a new form variable with default values needed to create a nft.
-
Fields include:
tokenName,symbol,totalSupply, anddecimals.
Now the form is ready for users to fill in the necessary details for their NFT function interaction.
Create NFT Collection
Let's write the functions to Create New NFT Collection on the aelf mainchain and the dAppChain.
Step 1: Write the function to Create New NFT Collection on the MainChain
-
The
create-nft/index.tsxfile includes the code to create NFTs. It allows users to create new NFTs. -
Find the comment
// step 1 - Create New NFT Collection on the mainchain. -
Replace the existing
createNftCollectionOnMainChainfunction with this code snippet:
 // step - 1 Create New NFT Collection on the mainchain
const createNftCollectionOnMainChain = async (values: {
  tokenName: string;
  symbol: string;
  totalSupply: string;
  decimals: string;
}) => {
  let createLoadingId;
  try {
    createLoadingId = toast.loading("Creating NFT Collection..");

    // Create an object with the necessary information for the new NFT collection.
    const createNtfInput: INftInput = {
      tokenName: values.tokenName, // Name of the nft Collection
      symbol: values.symbol, // Symbol of the token (You have to get it from your PortKey wallet on NFT seed from NFT section)
      totalSupply: values.totalSupply, // Total supply of the token
      decimals: values.decimals, // Decimals of the token
      issuer: currentWalletAddress, // Address of the token issuer
      isBurnable: true, // Indicates if the token can be burned
      issueChainId: sidechain_from_chain_id, // ID of the issuing chain
      owner: currentWalletAddress, // Owner's wallet address
    };

    // Call the smart contract method to create the new NFT collection on the main chain.
    const result = await mainChainSmartContract?.callSendMethod(
      "Create",
      currentWalletAddress,
      createNtfInput
    );

    // Log the result of the creation for debugging purposes.
    console.log("========= result of createNewNft =========", result);

    toast.update(createLoadingId, {
      render: "NFT Collection Created Successfully On MainChain",
      type: "success",
      isLoading: false,
    });
    removeNotification(createLoadingId);

    // Return the input data for further use.
    return createNtfInput;
  } catch (error: any) {
    // If there's an error, log it and alert the user.
    console.error(error.message, "=====error");
    toast.update(createLoadingId, {
      render: error.message,
      type: "error",
      isLoading: false,
    });
    removeNotification(createLoadingId);
    return "error";
  }
};
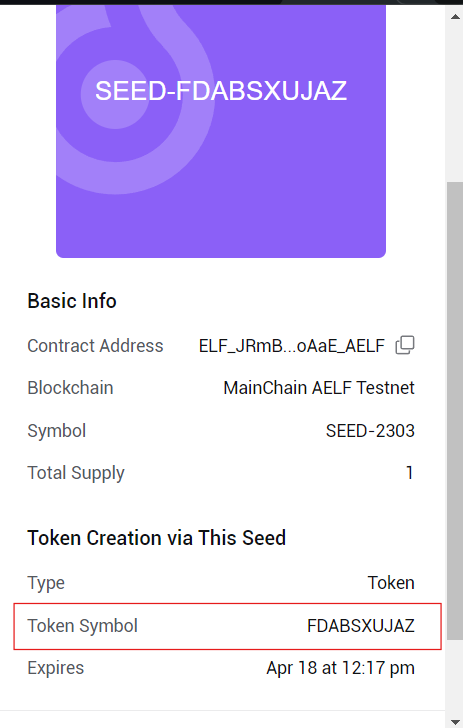
ℹ️ Note: You need to get symbol from the Portkey wallet.
-
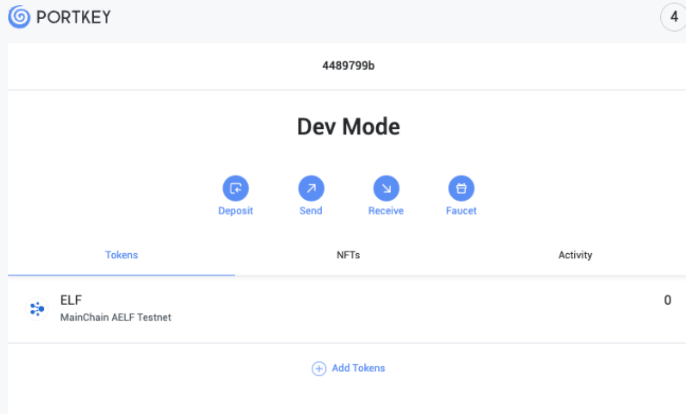
Follow Steps to get NFT symbol from Portkey Wallet:
- Open Portkey Wallet.
- Go to the NFTs tab.
- You will find the SEED that you already got from the above seed generation step.
- Click on the SEED to see details.
- You will find the Token Symbol inside the Token Creation via This Seed section.
- Copy and use that value of the token symbol.
What This Function Does:
-
Creates an Object with NFT Details : It prepares the data needed to create a new NFT collection.
-
Calls Smart Contract Method : It interacts with the blockchain smart contract to create the new NFT collection using the prepared data.
-
Logs Information : It logs the result for debugging purposes.
-
Return Values of Object : It returns necessary values as a object.
Next, we'll write the Validate Collection Info Exist function.
Step 2: Write the validates collection info exist function
-
Scroll up to find the comment
// step 2 - Validate Collection information exist. -
Replace the existing
validateNftCollectionInfofunction with this code snippet:
// step 2 - Validate Collection information exist
// This function validates if the token collection information already exists on the main blockchain.
const validateNftCollectionInfo = async (values: INftInput) => {
  let validateLoadingId
  try {
    // Start Loading before initiate the transaction
    validateLoadingId = toast.loading(
      <CustomToast
        title="Transaction is getting validated on aelf blockchain. Please wait!"
        message="Validation means transaction runs through a consensus algorithm to be selected or rejected. Once the status changes process will complete. It usually takes some time in distributed systems."
      />
    );

    // Create an object with the necessary information for token validation.
    const validateInput = {
      symbol: values.symbol, // Symbol of the token
      tokenName: values.tokenName, // Name of the token
      totalSupply: values.totalSupply, // Total supply of the token
      decimals: values.decimals, // Decimals of the token
      issuer: currentWalletAddress, // Address of the token issuer
      isBurnable: true, // Indicates if the token can be burned
      issueChainId: sidechain_from_chain_id, // ID of the issuing chain
      owner: currentWalletAddress, // Owner's wallet address
    };

    // get mainnet contract
    const aelfTokenContract = await getTokenContract(aelf, wallet);

    // prepare Sign the transaction using contract method (ValidateTokenInfoExists Function)
    const signedTx = aelfTokenContract.ValidateTokenInfoExists.getSignedTx(validateInput);

    // send the transaction using signed Transaction
    const { TransactionId: VALIDATE_TXID } = await aelf.chain.sendTransaction(
      signedTx
    );

    // get Validate Result
    let VALIDATE_TXRESULT = await aelf.chain.getTxResult(VALIDATE_TXID);

    // we need to wait till our latest index Hight grater than or equal to our Transaction block number
    let heightDone = false;

    while (!heightDone) {
      // get latest index Hight
      const sideIndexMainHeight = await GetParentChainHeight();
      if (
        // check the latest index Hight is grater than or equal
        sideIndexMainHeight >= VALIDATE_TXRESULT.Transaction.RefBlockNumber
      ) {
        VALIDATE_TXRESULT = await aelf.chain.getTxResult(VALIDATE_TXID);
        heightDone = true;
      }
    }

    console.log("VALIDATE_TXRESULT", VALIDATE_TXRESULT);

    // Update the Loading Message
    toast.update(validateLoadingId, {
      render: "Validating Token Successfully Executed",
      type: "success",
      isLoading: false,
    });

    // Remove the Loading Message
    removeNotification(validateLoadingId);

    // Return necessary details.
    return {
      transactionId: VALIDATE_TXID,
      signedTx: signedTx,
      BlockNumber: VALIDATE_TXRESULT.BlockNumber,
    };

  } catch (error: any) {
    // If there's an error, log it and alert the user.
    console.error(error.message, "=====error in validateTokenInfoExist");
    toast.update(validateLoadingId, {
      render: error.message,
      type: "error",
      isLoading: false,
    });
    removeNotification(validateLoadingId);
    return "error";
  }
};
What This Function Does:
-
Creates an Object with Validate Collection Details : It prepares the data needed to validate the token information.
-
Calls Smart Contract Method : It interacts with the multi-token smart contract method to check if the token information already exists using the prepared data.
-
Return Values : It returns necessary values as an object.
Next, we'll write the Get the parent chain height function.
Step 3: Write the get the parent chain height function
-
Scroll up to find the comment
// Step 3: Get the parent chain height. -
Replace the existing
GetParentChainHeightfunction with the following code snippet:
// Step 3: Get the parent chain height
// This function fetches the current height of the parent blockchain.
const GetParentChainHeight = async () => {
  try {
    const tdvwCrossChainContract = await getCrossChainContract(tdvw, wallet);
    // Call the smart contract method to get the parent chain height.
    const result = await tdvwCrossChainContract.GetParentChainHeight.call()
    // Return the parent chain height if it exists, otherwise return an empty string.
    return result ? (result.value as string) : "";
  } catch (error: any) {
    // If there's an error, log it and return an error status.
    console.error(error, "=====error in GetParentChainHeight");
    return "error";
  }
};
What This Function Does:
-
Calls Smart Contract Method : It interacts with the side chain smart contract method to fetch the current height of the parent blockchain.
-
Returns Parent Chain's Height : It returns the parent chain's height if it exists.
Next, we'll write the Fetch the Merkle path function.
Step 4: Write the fetch the merkle path function
-
Scroll up to find the comment
// step 4 - Fetch the merkle path by transaction Id. -
Replace the existing
getMerklePathByTxIdfunction with this code snippet:
// step 4 - Fetch the merkle path by transaction Id
const getMerklePathByTxId = async (aelf: any, txId: string) => {
  try {
    const { MerklePathNodes } = await aelf.chain.getMerklePathByTxId(txId);

    const formattedMerklePathNodes = MerklePathNodes.map(
      ({
        Hash,
        IsLeftChildNode,
      }: {
        Hash: string,
        IsLeftChildNode: boolean,
      }) => ({
        hash: Hash,
        isLeftChildNode: IsLeftChildNode,
      })
    );

    return { merklePathNodes: formattedMerklePathNodes };
  } catch (error) {
    console.error("Error fetching Merkle path:", error);
    throw new Error("Failed to get Merkle path by transaction ID.");
  }
};
What This Function Does:
-
Fetches Merkle Path : It sends a request to fetch the merkle path using the transaction ID.
-
Parses Response : It parses the response from the server as JSON.
-
Returns Merkle Path Nodes : It extracts and returns the merkle path of the nodes from the JSON response.
-
Handles Errors : If an error occurs, it clears the transaction status and logs the error.
Next, we'll write the Create a Collection on the cross-chain function.
Step 5: Write a function to create a collection on the side chain
-
Scroll up to find the comment
// step 5 - Create a collection on the dAppChain. -
Replace the existing
createCollectionOnSideChainfunction with this code snippet:
// step 5 - Create a collection on the dAppChain
const createCollectionOnSideChain = async (
  transactionId: string,
  signedTx: string,
  BlockNumber: number
) => {
  let crossChainLoadingId;
  try {
    crossChainLoadingId = toast.loading(
      "Creating Collection on SideChain..."
    );

      const merklePath = await getMerklePathByTxId(aelf, transactionId);

      const tdvwTokenContract = await getTokenContract(tdvw, wallet);

      const CROSS_CHAIN_CREATE_TOKEN_PARAMS = {
        fromChainId: mainchain_from_chain_id,
        parentChainHeight: "" + BlockNumber,
        // @ts-ignore
        transactionBytes: Buffer.from(signedTx, "hex").toString("base64"),
        merklePath,
      };
      const signedTx2 =
        await tdvwTokenContract.CrossChainCreateToken.getSignedTx(
          CROSS_CHAIN_CREATE_TOKEN_PARAMS
        );

      let done = false;

      while (!done) {
        try {
          await delay(10000);
          const { TransactionId } = await tdvw.chain.sendTransaction(signedTx2);
          const txResult = await tdvw.chain.getTxResult(TransactionId);

          if (txResult.Status === "SUCCESS" || txResult.Status === "MINED") {
            done = true;
            setIsNftCollectionCreated(true);
            toast.update(crossChainLoadingId, {
              render: "Collection was Created Successfully On SideChain",
              type: "success",
              isLoading: false,
            });
            removeNotification(crossChainLoadingId);
            toast.info("You Can Create NFT now");
            setTransactionStatus(false);
          }
        } catch (err: any) {
          console.log(err);
          if (err.Error.includes("Cross chain verification failed.")) {
            console.log("Exit.");
            done = true;
          }
        }
      }
      return "success";
    } catch (error:any) {
      toast.update(crossChainLoadingId, {
        render: error.message,
        type: "error",
        isLoading: false,
      });
      removeNotification(validateLoadingId);
      return "error";
    }
  };
What This Function Does:
-
Displays Loading Toast: Shows a notification indicating the creation process of the collection on the dAppChain.
-
Fetches Merkle Path: Retrieves the merkle path using the provided transactionId.
-
Prepares and Signs Transaction: Constructs parameters for the cross-chain transaction and signs it.
-
Sends Transaction and Checks Status: Sends the signed transaction and polls for its status every 10 seconds. Updates the notification and state, if successful.
-
Handles Errors: Logs errors and returns "error" if something goes wrong.
-
Final Return: Returns "success" upon successful completion.
Create NFT Token
Step 1: Write a Function to create NFTs on the mainchain
Now, let's write the create NFTs on mainchain function.
-
Scroll down to find the comment
// step 6 - Create an NFT on the mainchain. -
Replace the existing
createNFTOnMainChainfunction with this code snippet:
// step 6 - Create an NFT on the mainchain
const createNFTOnMainChain = async (values: {
  tokenName: string;
  symbol: string;
  totalSupply: string;
}) => {
  let createMainChainNFTLoadingId;

  try {
    createMainChainNFTLoadingId = toast.loading(
      "Creating NFT on MainChain..."
    );

    // Preparing Parameter for Create Function
    const createNtfMainChainInput = {
      tokenName: values.tokenName,
      symbol: values.symbol,
      totalSupply: values.totalSupply,
      issuer: currentWalletAddress,
      isBurnable: true,
      issueChainId: sidechain_from_chain_id,
      owner: currentWalletAddress,
      externalInfo: {},
    };

    const resultMainchain = await mainChainSmartContract?.callSendMethod(
      "Create",
      currentWalletAddress,
      createNtfMainChainInput
    );

    console.log(
      "========= result of createNewNft =========",
      resultMainchain
    );

    toast.update(createMainChainNFTLoadingId, {
      render: "NFT Created Successfully on MainChain",
      type: "success",
      isLoading: false,
    });
    removeNotification(createMainChainNFTLoadingId);

    return "success";
  } catch (error: any) {
    if (!createMainChainNFTLoadingId) {
      return "error";
    }
    toast.update(createMainChainNFTLoadingId, {
      render: error.message,
      type: "error",
      isLoading: false,
    });
    removeNotification(createMainChainNFTLoadingId, 5000);
    return "error";
  }
};
What this function does:
-
Displays Loading Toast: Shows a notification indicating the creation process of the NFT on the mainchain.
-
Prepares Parameters: Constructs input parameters for creating the NFT, including token details and the issuer's information.
-
Calls Smart Contract: Sends a request to the mainchain smart contract to create the NFT using the prepared parameters.
-
Handles Success: Updates the notification to show successful NFT creation.
-
Handles Errors: Displays an error message if the operation fails and logs the error.
-
Final Return: Returns
"success"if the NFT is created successfully; otherwise, returns"error".
Step 2: Write the Function for Validate NFT Info Exist
Now, let's write the Validate NFT Info Exist function.
-
Scroll down to find the comment
// step 7 - Validate an NFT token on the mainchain. -
Replace the existing
validateNftTokenfunction with this code snippet:
// step 7 - Validate an NFT token on the maincgit stashhain
const validateNftToken = async (values: INftParams) => {
  let validateNFTLoadingId;
  try {
    // Start Loading before initiate the transaction
    validateNFTLoadingId = toast.loading(
      <CustomToast
        title="Transaction is getting validated on aelf blockchain. Please wait!"
        message="Validation means transaction runs through a consensus algorithm to be selected or rejected. Once the status changes process will complete. It usually takes some time in distributed systems."
      />
    );

    // Create an object with the necessary information for token validation.
    const validateInput = {
      symbol: values.symbol,
      tokenName: values.tokenName,
      totalSupply: values.totalSupply,
      issuer: currentWalletAddress,
      isBurnable: true,
      issueChainId: sidechain_from_chain_id,
      owner: currentWalletAddress,
      externalInfo: {},
    };

    // get mainnet contract
    const aelfTokenContract = await getTokenContract(aelf, wallet);

    // prepare Sign the transaction using contract method (ValidateTokenInfoExists Function)
    const signedTx =
      aelfTokenContract.ValidateTokenInfoExists.getSignedTx(validateInput);

    // send the transaction using signed Transaction
    const { TransactionId: VALIDATE_TXID } = await aelf.chain.sendTransaction(
      signedTx
    );

    await delay(3000);

    // get Validate Result
    let VALIDATE_TXRESULT = await aelf.chain.getTxResult(VALIDATE_TXID);

    await delay(3000);

    // if dAppChain index has a MainChain height greater than validateTokenInfoExist's
    let heightDone = false;

    while (!heightDone) {
      // get latest index Hight
      const sideIndexMainHeight = await GetParentChainHeight();
      if (
        // check the latest index Hight is grater than or equal
        sideIndexMainHeight >= VALIDATE_TXRESULT.Transaction.RefBlockNumber
      ) {
        VALIDATE_TXRESULT = await aelf.chain.getTxResult(VALIDATE_TXID);
        heightDone = true;
      }
    }

    console.log(VALIDATE_TXRESULT, "VALIDATE_TXRESULT=====2");

    const merklePath = await getMerklePathByTxId(aelf, VALIDATE_TXID);

    toast.update(validateNFTLoadingId, {
      render: "Validating NFT Successfully Executed",
      type: "success",
      isLoading: false,
    });
    removeNotification(validateNFTLoadingId);

    // return necessary values
    return {
      parentChainHeight: VALIDATE_TXRESULT.BlockNumber,
      signedTx: signedTx,
      merklePath: merklePath,
    };
  } catch (error) {
    toast.update(validateNFTLoadingId, {
      render: error.message,
      type: "error",
      isLoading: false,
    });
    removeNotification(validateLoadingId);
    return "error";
  }
};
Here's what the function does:
-
Displays Loading Toast: Shows a notification indicating that the NFT validation is in progress on the blockchain.
-
Prepares Validation Input: Constructs the input parameters needed for validating the NFT token.
-
Gets Token Contract: Retrieves the token contract instance from the MainChain.
-
Signs and Sends Transaction: Signs the transaction to validate the token info and sends it to the blockchain.
-
Polls for Transaction Result: Waits for the transaction result and ensures the transaction has reached the required block height.
-
Fetches Merkle Path: Retrieves the Merkle path for the validated transaction.
-
Handles Success: Updates the notification to show successful validation and returns necessary values.
-
Handles Errors: Logs errors and returns
"error"if something goes wrong.
Step 3: Write a Function for Create NFT on dAppChain
Now, let's write the Create NFT on dAppChain function.
-
Scroll down to find the comment
// step 8 - Create a NFT on dAppChain. -
Replace the existing
createNftTokenOnSideChainfunction with this code snippet:
// step 8 - Create a NFT on dAppChain.
const createNftTokenOnSideChain = async (values: INftValidateResult) => {
  let createSideChainNFTLoadingId;
  try {
    createSideChainNFTLoadingId = toast.loading(
      "Creating NFT on SideChain..."
    );

    const CROSS_CHAIN_CREATE_TOKEN_PARAMS = {
      fromChainId: mainchain_from_chain_id,
      parentChainHeight: values.parentChainHeight,
      transactionBytes: Buffer.from(values.signedTx, "hex").toString("base64"),
      merklePath: values.merklePath,
    };

    await sideChainSmartContract?.callSendMethod(
      "CrossChainCreateToken",
      currentWalletAddress,
      CROSS_CHAIN_CREATE_TOKEN_PARAMS
    );

    toast.update(createSideChainNFTLoadingId, {
      render: "NFT Created Successfully On SideChain",
      type: "success",
      isLoading: false,
    });
    removeNotification(createSideChainNFTLoadingId);
    return "success";
  } catch (error) {
    toast.update(createSideChainNFTLoadingId, {
      render: error.message,
      type: "error",
      isLoading: false,
    });
    removeNotification(createSideChainNFTLoadingId);
    return "error";
  }
};
Here's what the function does:
-
Displays Loading Toast: Shows a notification indicating that the NFT is being created on the dAppChain.
-
Prepares Cross-Chain Transaction Parameters: Constructs the parameters needed for creating the NFT on the dAppChain, including chain IDs, block height, transaction data, and Merkle path.
-
Calls Smart Contract Method: Sends the transaction to the dAppChain smart contract to create the NFT.
-
Handles Success: Updates the notification to show successful NFT creation on the dAppChain.
-
Handles Errors: Logs errors and returns
"error"if something goes wrong.
Step 4: Write a Function for Issue NFT Token which has been Created on dAppChain.
Now, let's write the Issue NFT Function.
-
Scroll down to find the comment
// step 9 - Issue a NFT Function which has been Created on dAppChain. -
Replace the existing
issueNftOnSideChainfunction with this code snippet:
// step 9 - Issue a NFT Function which has been Created on dAppChain
const issueNftOnSideChain = async (values: {
  symbol: string;
  amount: string;
  memo: string;
}) => {
  let issuingNFTLoadingId
  try {
    issuingNFTLoadingId = toast.loading(
      "Issuing NFT on SideChain..."
    );
    const issueNftInput = {
      symbol: values.symbol,
      amount: values.amount,
      memo: values.memo,
      to: currentWalletAddress,
    };
    const result = await sideChainSmartContract?.callSendMethod(
      "Issue",
      currentWalletAddress,
      issueNftInput
    );
    console.log("========= result of createNewNft =========", result);

    toast.update(issuingNFTLoadingId, {
      render: "NFT Issue Successfully Executed",
      type: "success",
      isLoading: false,
    });
    removeNotification(issuingNFTLoadingId);
    toast.success("You will get NFT on your Wallet! It can take sometimes to get into your wallet");
    handleReturnClick();
    return "success";
  } catch (error: any) {
    toast.update(issuingNFTLoadingId, {
      render: error.message,
      type: "error",
      isLoading: false,
    });
    removeNotification(issuingNFTLoadingId);
    setTransactionStatus(false);
    return "error";
  }
};
Here's what the function does:
-
Displays Loading Toast: Shows a notification indicating that the NFT is being issued on the dAppChain.
-
Prepares Issuance Input: Constructs the input parameters for issuing the NFT, including symbol, amount, memo, and recipient address.
-
Calls Smart Contract Method: Sends the transaction to the dAppChain smart contract to issue the NFT.
-
Handles Success: Updates the notification to show successful issuance and notifies the user that the NFT will appear in their wallet.
-
Handles Errors: Logs and displays any error messages, updates the transaction status, and returns
"error".
Step 5: Create a Function to Call Necessary Functions for NFT Creation
Now, let's write the createNftToken Function.
-
Scroll down to find the comment
// step 10 - Call Necessary Function for Create NFT. -
Replace the existing
createNftTokenfunction with this code snippet:
// step 10 - Call Necessary Function for Create NFT
const createNftToken = async (values: INftParams) => {
  try {
    const mainChainResult = await createNFTOnMainChain(values);

    if (mainChainResult === "error") {
      setTransactionStatus(false);
      return;
    }
    await delay(3000);

    const validateNFTData: INftValidateResult | "error" = await validateNftToken(values);

    if (validateNFTData === "error") {
      setTransactionStatus(false);
      return;
    }

    const sideChainResult = await createNftTokenOnSideChain(validateNFTData);

    if (sideChainResult === "error") {
      setTransactionStatus(false);
      return;
    }

    await issueNftOnSideChain({
      symbol: values.symbol,
      amount: values.totalSupply,
      memo: "We are issuing nftToken",
    });
    setTransactionStatus(false);
  } catch (error: any) {
    console.error(error, "=====error");
    setTransactionStatus(false);
    toast.error(error);
    return "error";
  }
};
Here's what the function does:
-
Creates NFT on MainChain: Calls
createNFTOnMainChainto create the NFT on the MainChain. If it fails, it updates the transaction status and exits. -
Validates NFT Token: Waits for 3 seconds, then calls
validateNftTokento validate the NFT. If validation fails, it updates the transaction status and exits. -
Creates NFT on dAppChain: Calls
createNftTokenOnSideChainto create the NFT on the dAppChain using the validated data. If it fails, it updates the transaction status and exits. -
Issues NFT on dAppChain: Calls
issueNftOnSideChainto issue the NFT. Updates the transaction status to false after completion. -
Handles Errors: Catches and logs any errors, updates the transaction status, and displays an error notification.
Configure Submit Form
Now, let's Write a Function to Call Necessary Functions for NFT Creation.
-
Scroll down to find the comment
// Step 11 - Handle Submit Form. -
Replace the existing
onSubmitfunction with this code snippet:
//Step 11 - Handle Submit Form
const onSubmit = async (values: z.infer<typeof formSchema>) => {
  setTransactionStatus(true);

  if (isNftCollectionCreated) {
    // Already Collection Created
    // create NFT Token
    await createNftToken(values);
  } else {
    // create NFT Collection on MainChain
    const createResult = await createNftCollectionOnMainChain(values);

    if (createResult === "error") {
      setTransactionStatus(false);
      return;
    }
    // Validate NFT Collection
    const validateCollectionResult = await validateNftCollectionInfo(
      createResult
    );

    if (validateCollectionResult === "error") {
      setTransactionStatus(false);
      return;
    }

    // create NFT Collection on dAppChain
    await createCollectionOnSideChain(
      validateCollectionResult.transactionId,
      validateCollectionResult.signedTx,
      validateCollectionResult.BlockNumber
    );
  }
};
Here's what the function does:
-
Starts Transaction: Sets the transaction status to true.
-
Checks NFT Collection Status: If the NFT collection is already created, calls
createNftTokento create the NFT token. -
Creates and Validates NFT Collection: If the collection isn’t created, calls
createNftCollectionOnMainChainto create it. If successful, validates the NFT collection withvalidateNftCollectionInfo. -
Creates Collection on dAppChain: If validation is successful, calls
createCollectionOnSideChainto create the collection on the dAppChain. -
Handles Errors: Updates the transaction status to false and exits if any step fails.
Fetch NFT Data
Let's write the Function for the fetch NFT data from user's Wallet using API.
Step 1: Locate the File
- go to the
src/lib/commonFunctions.tsfile.
Step 2: Write the Helper Functions for fetch the NFT data
-
The
commonFunctions.tsfile is contains the helpers function for fetch NFT and etc. -
Find the comment
// Function to get the balance of a specific NFT. -
Replace the existing
getBalanceOfNftfunction with this code snippet:
// Function to get the balance of a specific NFT
const getBalanceOfNft = async (
  values: {
    symbol: string,
    owner: string,
  },
  sideChainSmartContract: any
): Promise<number> => {
  // @ts-ignore
  const { data }: { data: { balance: number } } =
    await sideChainSmartContract?.callViewMethod("getBalance", values);
  return data.balance;
};
Here's what the function does:
- Retrieves NFT Balance: The function
getBalanceOfNftfetches the balance of a specific NFT for a given owner. - Parameters: It takes two parameters:
values: An object containing thesymbolof the NFT and theowneraddress.sideChainSmartContract: An instance of the side chain smart contract.
- Calls View Method: It calls the
getBalanceview method on the side chain smart contract with the providedvalues. - Returns Balance: It extracts the
balancefrom the response and returns it as a number.
-
Find the comment
// Function to fetch balance information for an array of NFTs. -
Replace the existing
fetchNftBalancesfunction with this code snippet:
// Function to fetch balance information for an array of NFTs
const fetchNftBalances = async (
  nfts: Nft[],
  ownerAddress: string,
  sideChainSmartContract: any
): Promise<Nft[]> => {
  const nftDataWithBalances = await Promise.all(
    nfts.map(async (nft) => {
      const balance = await getBalanceOfNft(
        {
          symbol: nft.nftSymbol,
          owner: ownerAddress,
        },
        sideChainSmartContract
      );
      return { ...nft, balance };
    })
  );

  return nftDataWithBalances;
};
Here's what the function does:
- Fetches Balances for Multiple NFTs: The function
fetchNftBalancesretrieves balance information for an array of NFTs for a specific owner. - Parameters: It takes three parameters:
nfts: An array ofNftobjects, each representing an NFT.ownerAddress: A string representing the address of the owner.sideChainSmartContract: An instance of the side chain smart contract.
- Maps NFTs to Balances: It uses
Promise.allto concurrently fetch the balance for each NFT by calling thegetBalanceOfNftfunction. - Combines NFT Data with Balances: For each NFT, it combines the existing NFT data with the fetched balance.
- Returns Updated NFT Array: It returns a new array of
Nftobjects, each including its respective balance.
-
Find the comment
// fetch NFT Data from eforest API. -
Replace the existing
fetchUserNftDatafunction with this code snippet:
// fetch NFT Data from eforest API
export const fetchUserNftData = async (
  currentWalletAddress: string,
  sideChainSmartContract: any
) => {
  try {
    const response = await fetch(
      "https://test.eforest.finance/api/app/nft/nft-infos-user-profile/myhold",
      {
        method: "POST",
        headers: {
          "Content-Type": "application/json",
        },
        body: JSON.stringify({
          ChainList: ["tDVV"],
          hasListingFlag: false,
          hasAuctionFlag: false,
          hasOfferFlag: false,
          collectionIds: [],
          address: currentWalletAddress,
          sorting: "ListingTime DESC",
        }),
      }
    );

    if (!response.ok) {
      throw new Error("Network response was not ok");
    }

    const responseData = await response.json();

    const newNftData = await fetchNftBalances(
      responseData.data.items,
      currentWalletAddress as string,
      sideChainSmartContract
    );

    return newNftData;
  } catch (error) {
    console.log(error);
    return "error"
  }
};
Here's what the function does:
- Fetches User NFT Data: The function
fetchUserNftDataretrieves NFT data for a specific user from the eforest API and fetches balance information for each NFT. - Parameters: It takes two parameters:
currentWalletAddress: A string representing the wallet address of the user.sideChainSmartContract: An instance of the side chain smart contract.
- API Request: It makes a POST request to the eforest API endpoint
https://test.eforest.finance/api/app/nft/nft-infos-user-profile/myholdwith the user's wallet address and some other parameters. - Checks Response: It checks if the response from the API is okay. If not, it throws an error.
- Parses Response: It parses the JSON response from the API.
- Fetches NFT Balances: It calls
fetchNftBalancesto get the balance for each NFT in the response data. - Returns Updated NFT Data: It returns the updated NFT data, each including its respective balance.
- Handles Errors: If any error occurs during the process, it logs the error and returns the string "error".
We have Prepared all necessary function for fetch NFT Data from User's Wallet.
Now, Let's call fetchUserNftData on necessary page.
Step 3: Call fetchUserNftData Functions on Home Page
-
go to the
src/pages/home/index.tsxfile. -
The
home/index.tsxfile contains the Home Page of NFT dApp -
Find the comment
// get NFT Data from User's wallet. -
Replace the existing
getNFTDatafunction with this code snippet:
// get NFT Data from User's wallet
const getNFTData = async () => {
  const result = await fetchUserNftData(
    currentWalletAddress as string,
    sideChainSmartContract
  );
  if (result !== "error") {
    setUserNfts(result);
  }
  setLoading(false);
};
Here's what the function does:
- Fetches NFT Data: The function
getNFTDataretrieves NFT data from the user's wallet. - Calls Fetch Function: It calls the
fetchUserNftDatafunction with thecurrentWalletAddressandsideChainSmartContractparameters. - Handles Result: It checks the result:
- If the result is not "error", it updates the state with the fetched NFT data by calling
setUserNfts(result).
- If the result is not "error", it updates the state with the fetched NFT data by calling
- Updates Loading State: Regardless of the result, it sets the loading state to false by calling
setLoading(false).
Step 4: Call fetchUserNftData Functions on Profile Page
-
go to the
src/pages/profile/index.tsxfile. -
The
profile/index.tsxfile contains the Home Page of NFT dApp -
Find the comment
// get NFT Data from User's wallet. -
Replace the existing
getNFTDatafunction with this code snippet:
// get NFT Data from User's wallet
const getNFTData = async () => {
  const result = await fetchUserNftData(
    currentWalletAddress as string,
    sideChainSmartContract
  );
  if (result !== "error") {
    setUserNfts(result);
  }
  setLoading(false);
};
Here's what the function does:
- Fetches NFT Data: The function
getNFTDataretrieves NFT data from the user's wallet. - Calls Fetch Function: It calls the
fetchUserNftDatafunction withcurrentWalletAddressandsideChainSmartContractas arguments. - Handles Successful Result: If the result from
fetchUserNftDatais not "error":- It updates the user's NFTs by calling
setUserNfts(result).
- It updates the user's NFTs by calling
- Updates Loading State: It sets the loading state to false by calling
setLoading(false), regardless of whether the fetch was successful or not.
Transfer NFT Token
As we have completed Create and Fetch NFT so now it's time to Transfer NFT.
So now let's Transfer NFT to other wallet now.
Step 1: Locate the File
- go to the
src/pages/transfer-nft/index.tsxfile. This file is the Transfer NFT page where users can enter details like theaddress,amountandmemo.
Step 2: Prepare Form for Transfer NFT
-
Find the comment
// Configure NFT Transfer Form. -
Replace the form variable with this code snippet:
// Configure NFT Transfer Form
const form = useForm<z.infer<typeof formSchema>>({
  resolver: zodResolver(formSchema),
  defaultValues: {
    address: "",
    amount: 0,
    memo: "",
  },
});
Here's what the function does:
-
Initializes a new form variable with default values needed to transfer a nft.
-
Fields include:
address,amount, andmemo.
Now your form is ready for users to fill in the necessary details for their NFTs Transfer function Interaction.
Step 3: Create NFT Transfer Function
-
Find the comment
// Transfer NFT to Other Wallet. -
Replace the form variable with this code snippet:
// Transfer NFT to Other Wallet
const transferNftToOtherAccount = async (values: {
  address: string;
  amount: string;
  memo: string;
}) => {

  if (Number(values.amount) > Number(nftBalance)) {
    toast.error("Amount must be Less than or Equal to Supply Balance");
    return;
  }

  const transferNFTLoadingId = toast.loading("Transfer Transaction Executing");

  try {
    const transferNtfInput = {
      to: values.address,
      symbol: nftSymbol,
      amount: +values.amount,
      memo: values.memo,
    };

    await sideChainSmartContract?.callSendMethod(
      "Transfer",
      currentWalletAddress,
      transferNtfInput
    );

    toast.update(transferNFTLoadingId, {
      render: "NFT Transferred Successfully!",
      type: "success",
      isLoading: false,
    });
    removeNotification(transferNFTLoadingId);

    await delay(3000);

    handleReturnClick();
  } catch (error: any) {
    console.error(error.message, "=====error");
    toast.error(error.message);
  }
};
Here's what the function does:
- Transfers NFT to Another Wallet: The function
transferNftToOtherAccounttransfers a specified amount of an NFT to another wallet. - Parameters: It takes a
valuesobject containing:address: The destination wallet address.amount: The amount of NFT to transfer.memo: An optional memo for the transfer.
- Checks Balance: It checks if the transfer amount is greater than the available
nftBalance. If it is, it shows an error message and exits the function. - Displays Loading Toast: It displays a loading toast notification indicating that the transfer transaction is executing.
- Prepares Transfer Data: It prepares the transfer data in the
transferNtfInputobject, which includes the destination address, NFT symbol, transfer amount, and memo. - Executes Transfer: It calls the
Transfermethod on the side chain smart contract to execute the transfer. - Success Handling: If the transfer is successful:
- It updates the toast notification to indicate success.
- It removes the loading notification.
- It waits for 3 seconds using
await delay(3000). - It calls
handleReturnClickto handle any post-transfer actions.
- Error Handling: If an error occurs during the transfer:
- It logs the error message to the console.
- It displays an error toast notification with the error message.
Step 4: Configure on handle Submit Form
-
Find the comment
// Handle Transfer Submit Form. -
Replace the form variable with this code snippet:
// Handle Transfer Submit Form
function onSubmit(values: z.infer<typeof formSchema>) {
  transferNftToOtherAccount(values);
}
Here's what the function does:
- Handles Form Submission: The function
onSubmithandles the submission of a transfer form. - Parameters: It takes
values, which is inferred from theformSchemaand represents the form's data. - Calls Transfer Function: It calls the
transferNftToOtherAccountfunction with the form values to initiate the NFT transfer.
Now that we've written all the necessary frontend functions and components, we're ready to run the NFT dApp application in the next step.
Run Application
In this step, we will run the NFT dApp application.
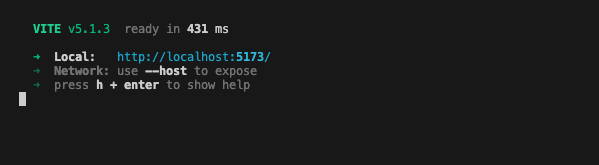
- To begin, run the following command on your terminal.
npm run dev
ℹ️ Note: Ensure that you are running this command under the nft/2-dapp folder.
-
You should observe the following as shown below.
-
Upon clicking on the localhost URL, you should be directed to the NFTs landing page as shown below.
If you are developing and testing this with GitHub codespace, you can use Port Forward to test the web server that is running in codespace, here is the link on how to use Port forward for codespace https://docs.github.com/en/codespaces/developing-in-a-codespace/forwarding-ports-in-your-codespace
-
Usually codespace will automatically forward port, you should see a pop-up message at the bottom right of your codespace browser window as shown in the diagram below:
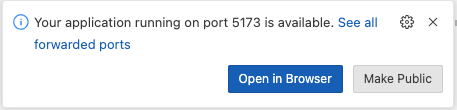
-
Click the link to open the NFT dApp in the browser.

Create Portkey Wallet
Portkey is the first AA wallet from aelf's ecosystem, migrating users, developers and projects from Web2 to Web3 with DID solution.
Users can swiftly log into Portkey via their Web2 social info with no private keys or mnemonics required. Underpinned by social recovery and decentralized guardian design, Portkey safeguards users' assets from centralized control and theft. Portkey has a unique payment delegation mechanism which enables interested parties to function as delegatees to pay for user activities on users' behalf. This means that users can create accounts for free and fees for other usages may also be covered in Portkey.
Portkey also provides crypto on/off-ramp services, allowing users to exchange fiat with crypto freely. It supports the storage and management of various digital assets such as tokens, NFTs, etc. The compatibility with multi-chains and seamless connection to all kinds of DApps makes Portkey a great way to enter the world of Web3.
With DID solution as its core, Portkey provides both Portkey Wallet and Portkey SDKs.
For more information, you may visit the official documentation for Portkey at https://doc.portkey.finance/.
- Download the Chrome extension for Portkey from https://chromewebstore.google.com/detail/portkey-wallet/iglbgmakmggfkoidiagnhknlndljlolb.
The Portkey extension supports Chrome browser only (for now). Please ensure that you are using Chrome browser. You may download Chrome from https://www.google.com/intl/en_sg/chrome/.
-
Once you have downloaded the extension, you should see the following on your browser as shown below.
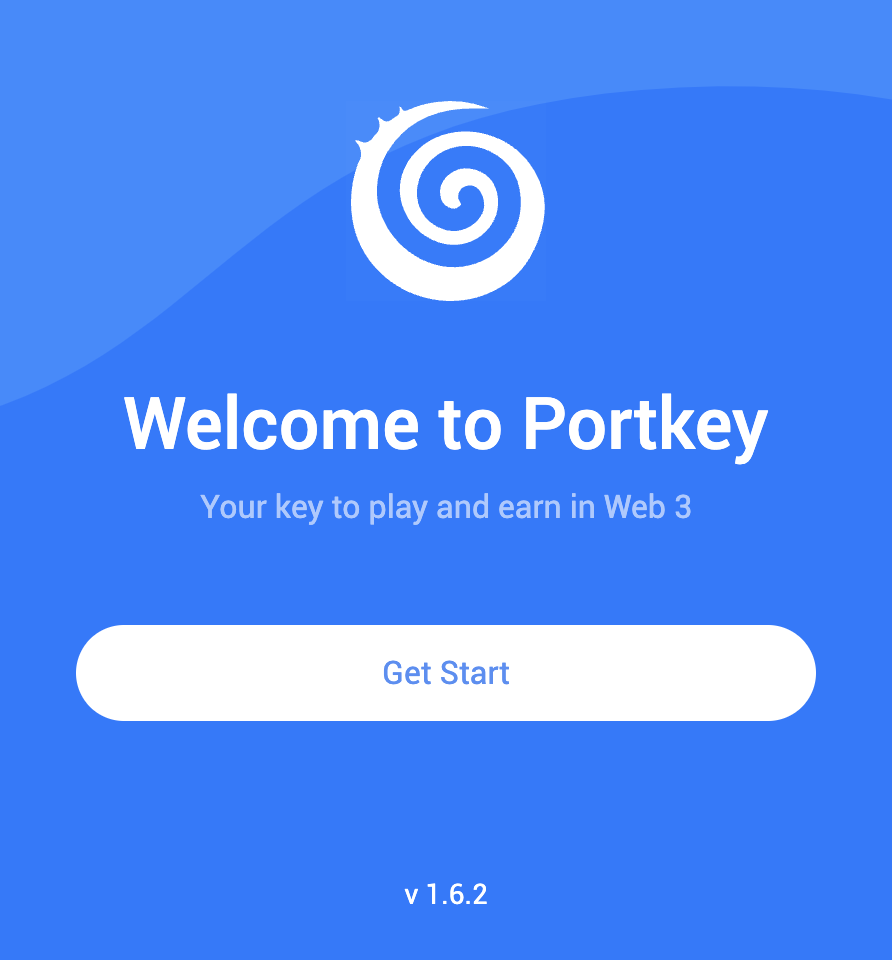
-
Click on
Get Startand you should see the following interface as shown below.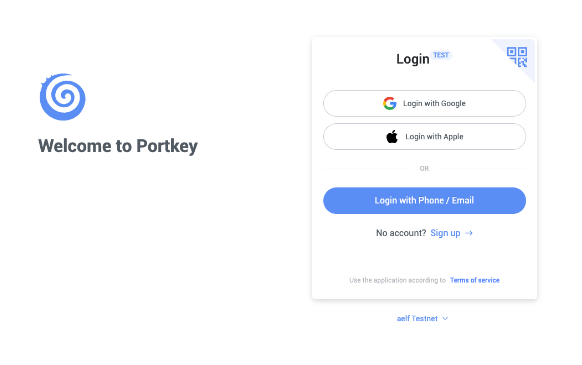
Sign up
-
Switch to aelf Testnet network by selecting it:
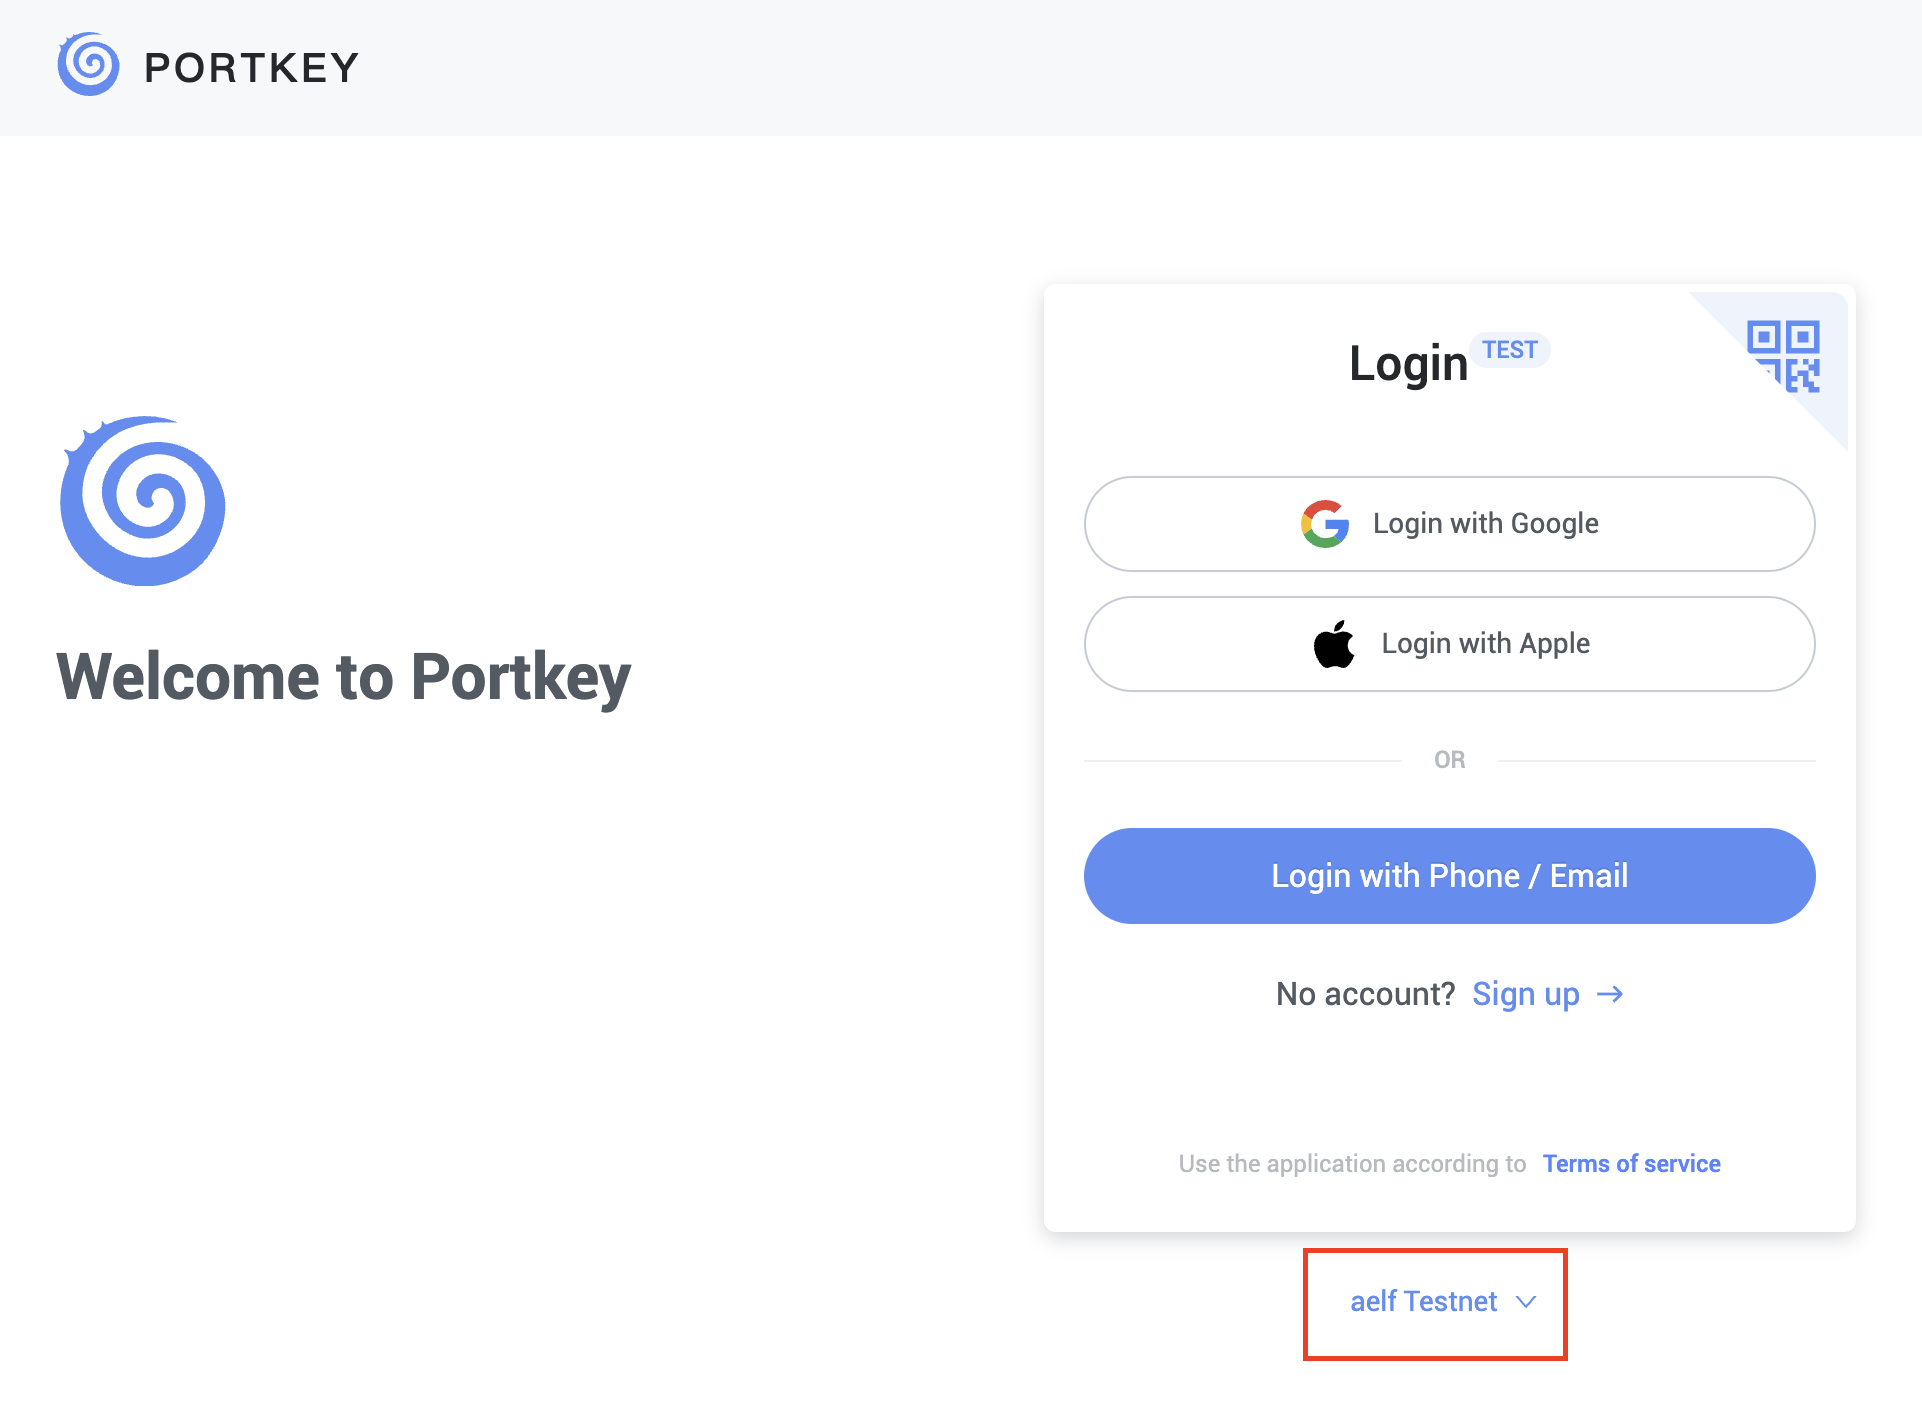
Please make sure you are using aelf Testnet in order to be able to receive your testnet tokens from the Faucet.
-
Proceed to sign up with a Google Account or your preferred login method and complete the necessary accounts creation prompts and you should observe the following interface once you have signed up.
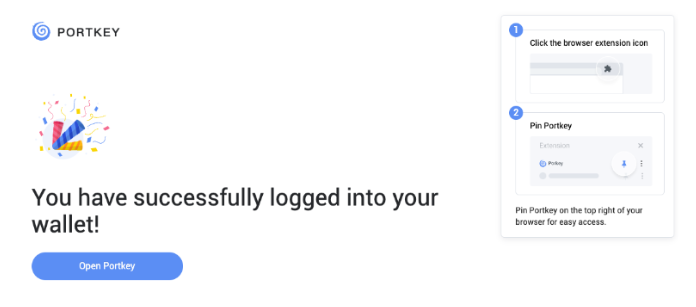
With that, you have successfully created your very first Portkey wallet within seconds. How easy was that?
It is highly recommended to pin the Portkey wallet extension for easier access and navigation to your Portkey wallet!
-
Next, click on ‘Open Portkey’ and you should now observe the following as shown below.
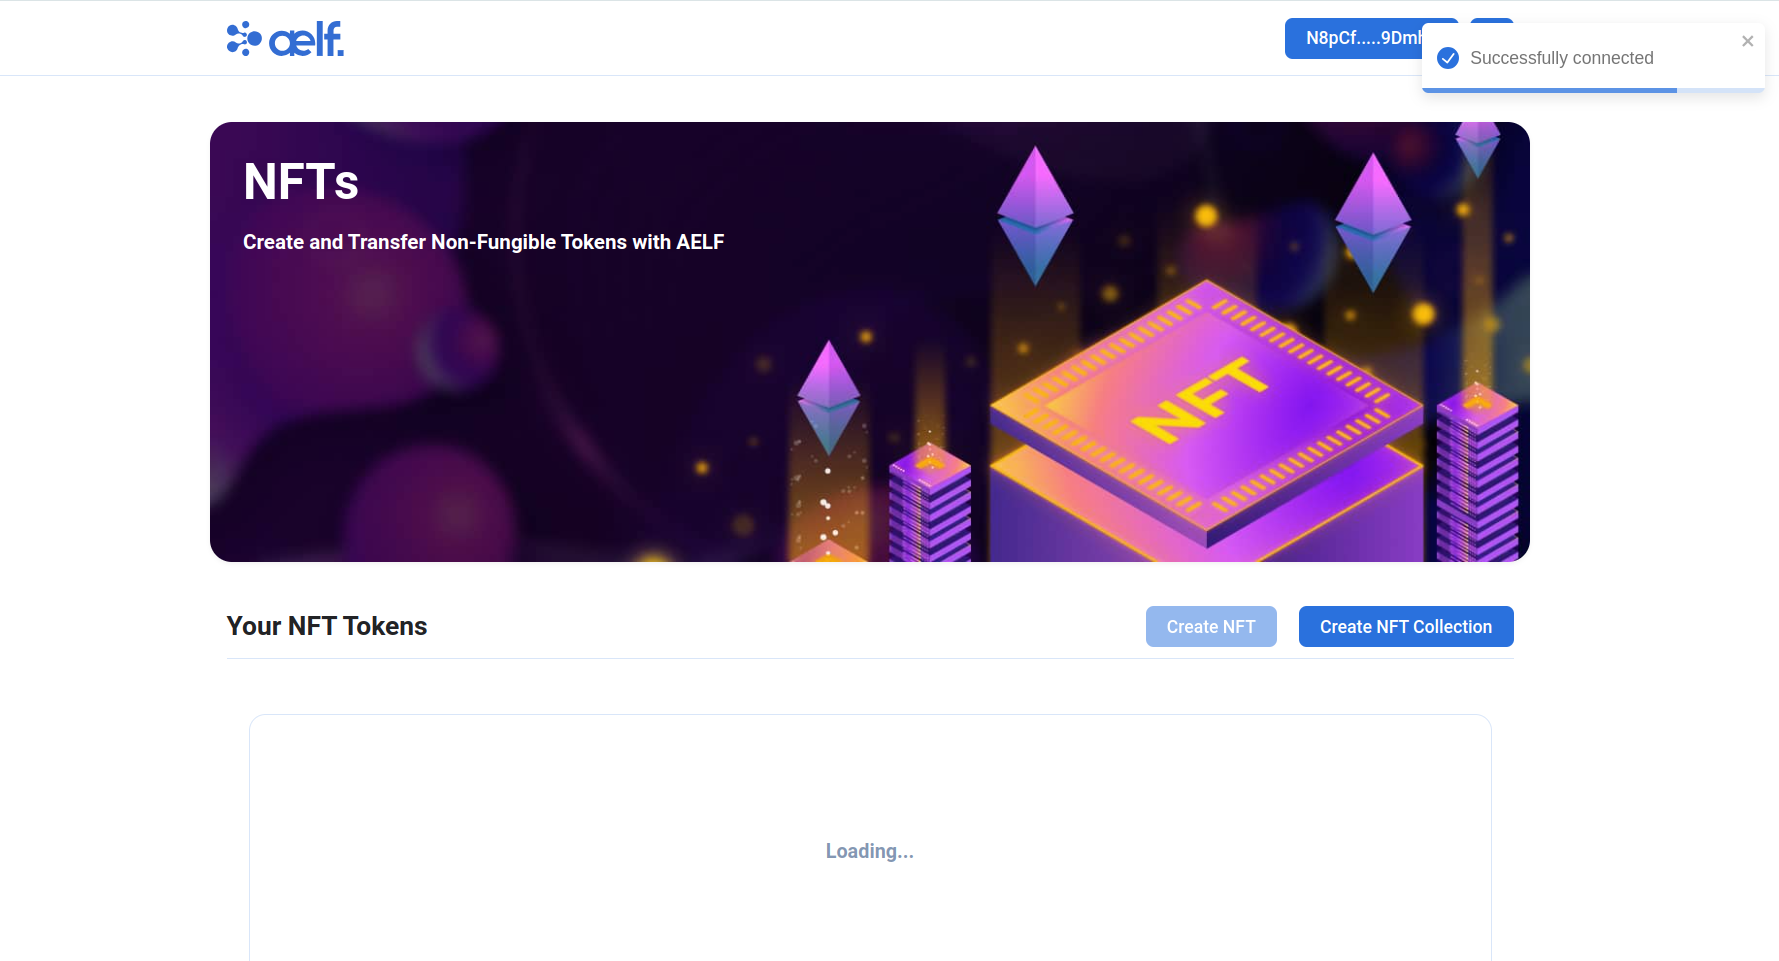
Connect Portkey Wallet
-
Click on "Connect Wallet" to connect your Portkey wallet.
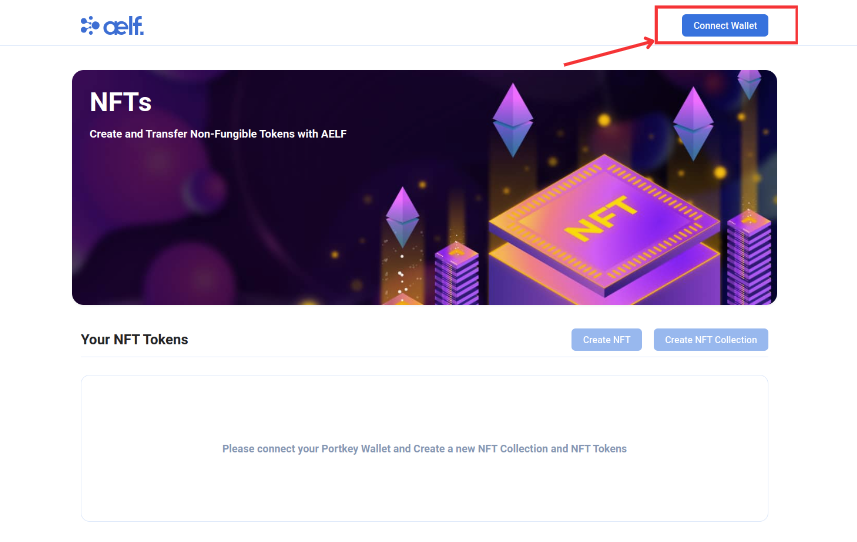
-
The button will change to "Your Wallet Address" when the connection is successful.
Create NFT Collection
-
Click on "Create NFT Collection" button to create new NFT Collection.
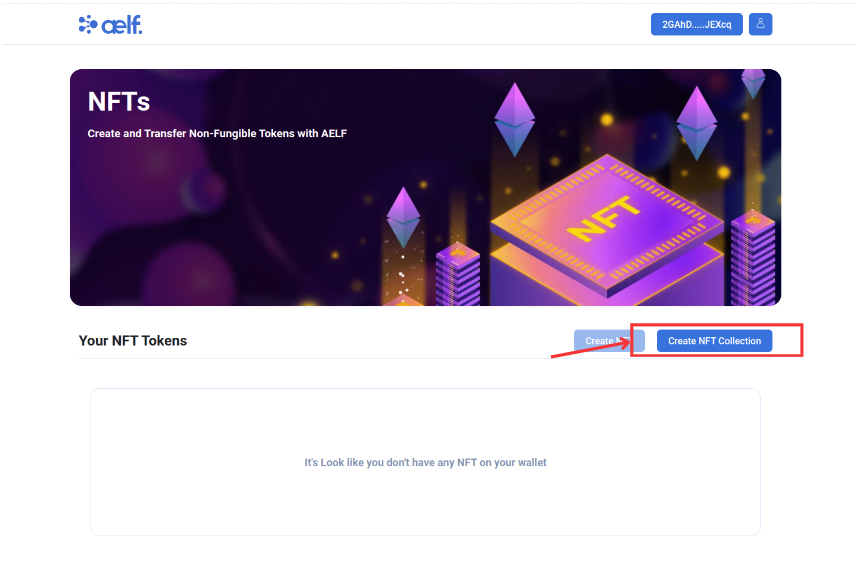
-
You will be redirect this create NFT Collection page
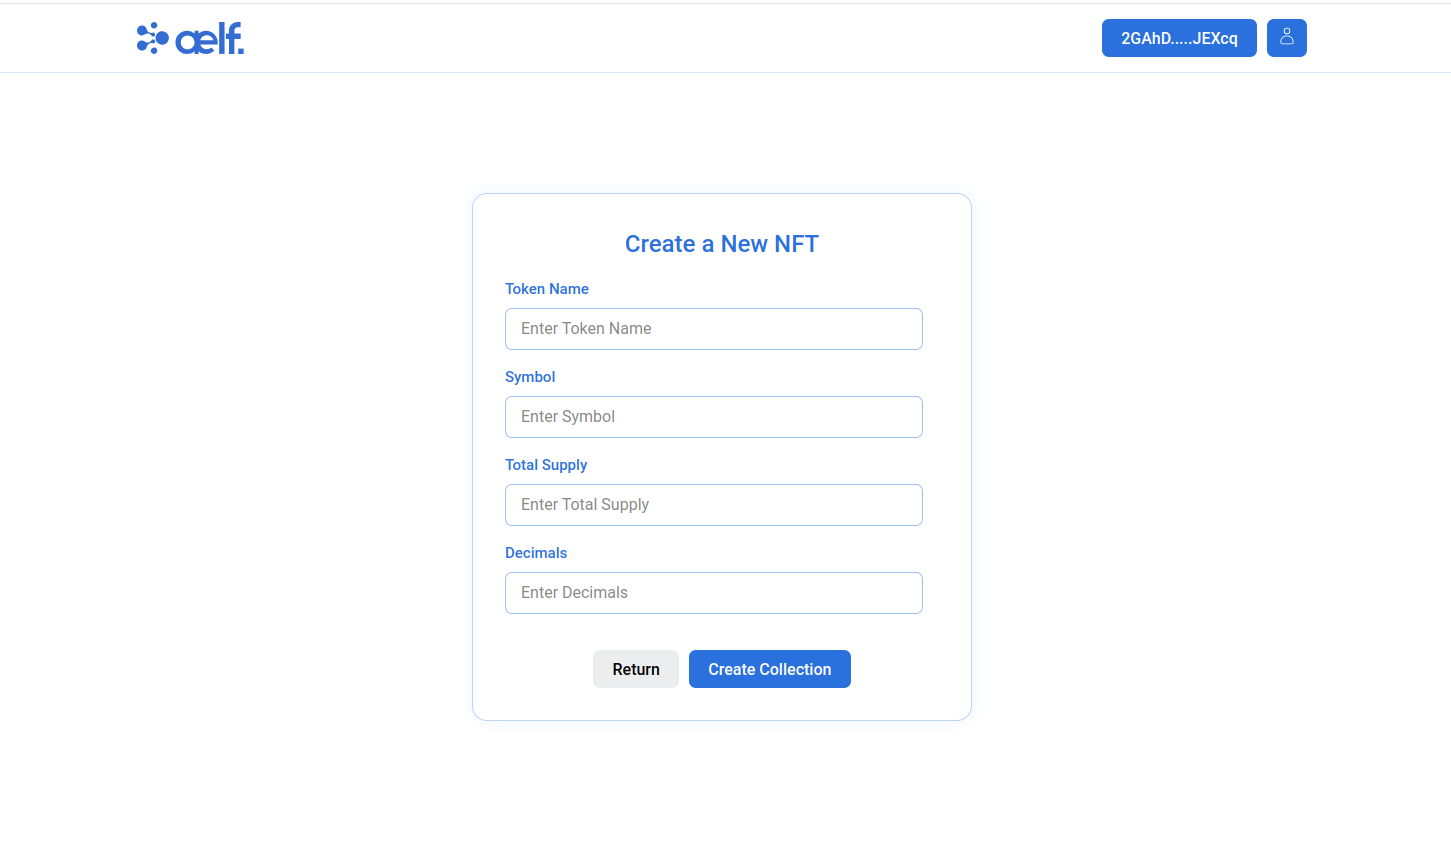
-
Now you need NFT Seed for create the new collection.
-
If you Don't have NFT Seed then please follow this steps to get it.
-
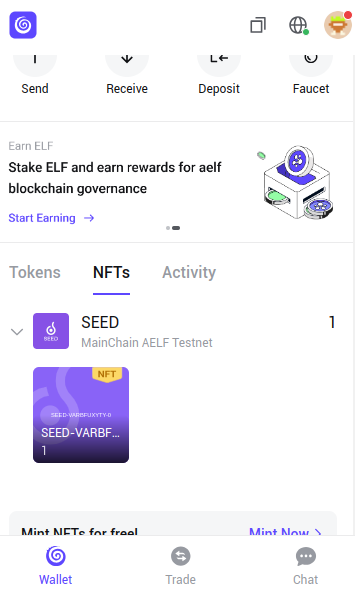
Open you Portkey Wallet and you will find the NFT Seed on NFT Tab.
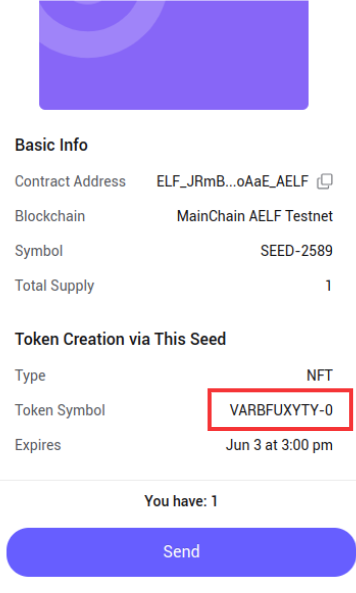
-
Copy the Token Symbol and use it on
Symbolfield of Form Submission of Create Collection. -
Fill all other Necessary Fields like
Token Namemeans(Collection Name),Total Supply,Decimals.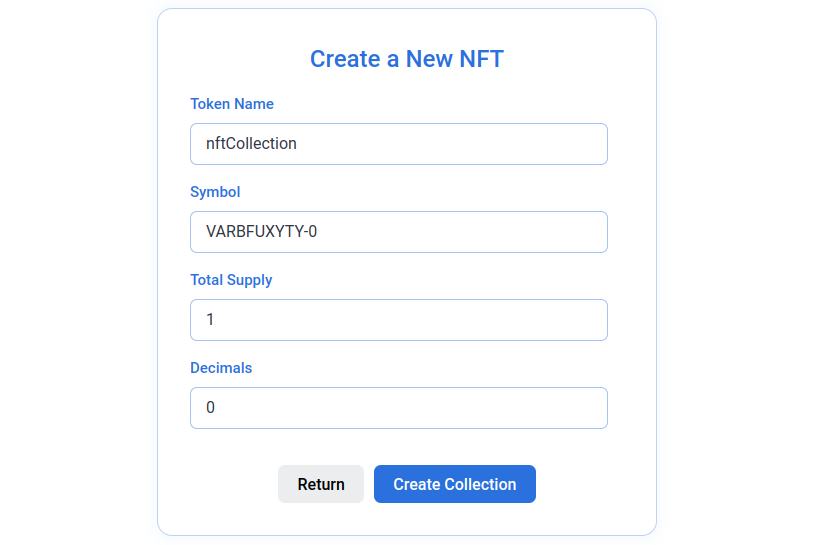
-
Click on Create Collection Button.
-
You will get Transaction Request on your Portkey Wallet so Sign In the Transaction.
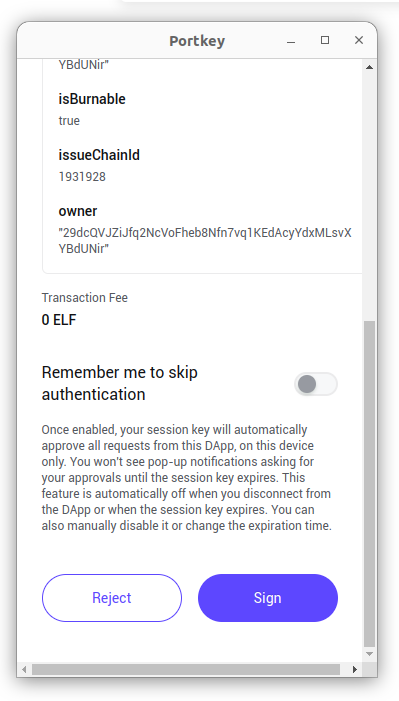
-
After Sign In the Transaction, Please wait to complete these steps. It will take approx 3-4 minutes.
- NFT Collection Created Successfully On MainChain.
- Validating Token Successfully Executed.
- Collection was Created Successfully On dAppChain.
Create NFT Token
-
Once you done with create collection process the Now, It's time to Create NFT.
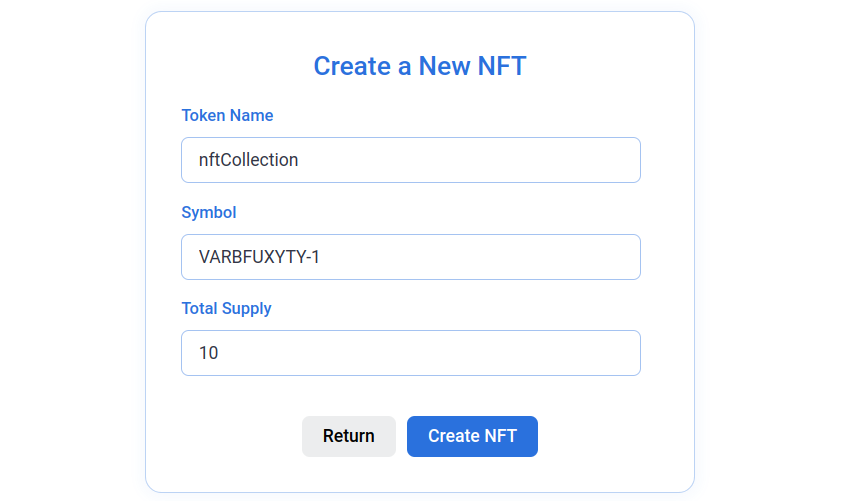
Please make sure the Symbol will be change to [your_symbol]-id. ie VARBFUXYTY-1, VARBFUXYTY-2, VARBFUXYTY-3 etc. It means you can only create Collection with id 0 like VARBFUXYTY-0 and for NFT Token Please use another integer as a id in Symbol.
-
Fill all Necessary Fields in Create NFT Form like
Token Namemeans(Collection Name),Symbolmeans(NFT Symbol), andTotal Supply. -
Click on Create NFT Button.
-
You will get Transaction Request on your Portkey Wallet so Sign In the Transaction for Create NFT as above you got for Create NFT Collection
-
After Sign In the Transaction, Please wait to complete these steps. It will take approx 3-4 minutes.
- NFT Created Successfully on MainChain.
- Validating NFT Successfully Executed.
- NFT Created Successfully On dAppChain.
- You will get NFT on your Wallet! It can take sometimes to get into your wallet.
-
After Successfully Create NFT, Now you redirected to Home page and as you can see you will get the NFT in your account. (It' take some time to store your NFT in your wallet so please reload the page multiple times till you get the NFT).
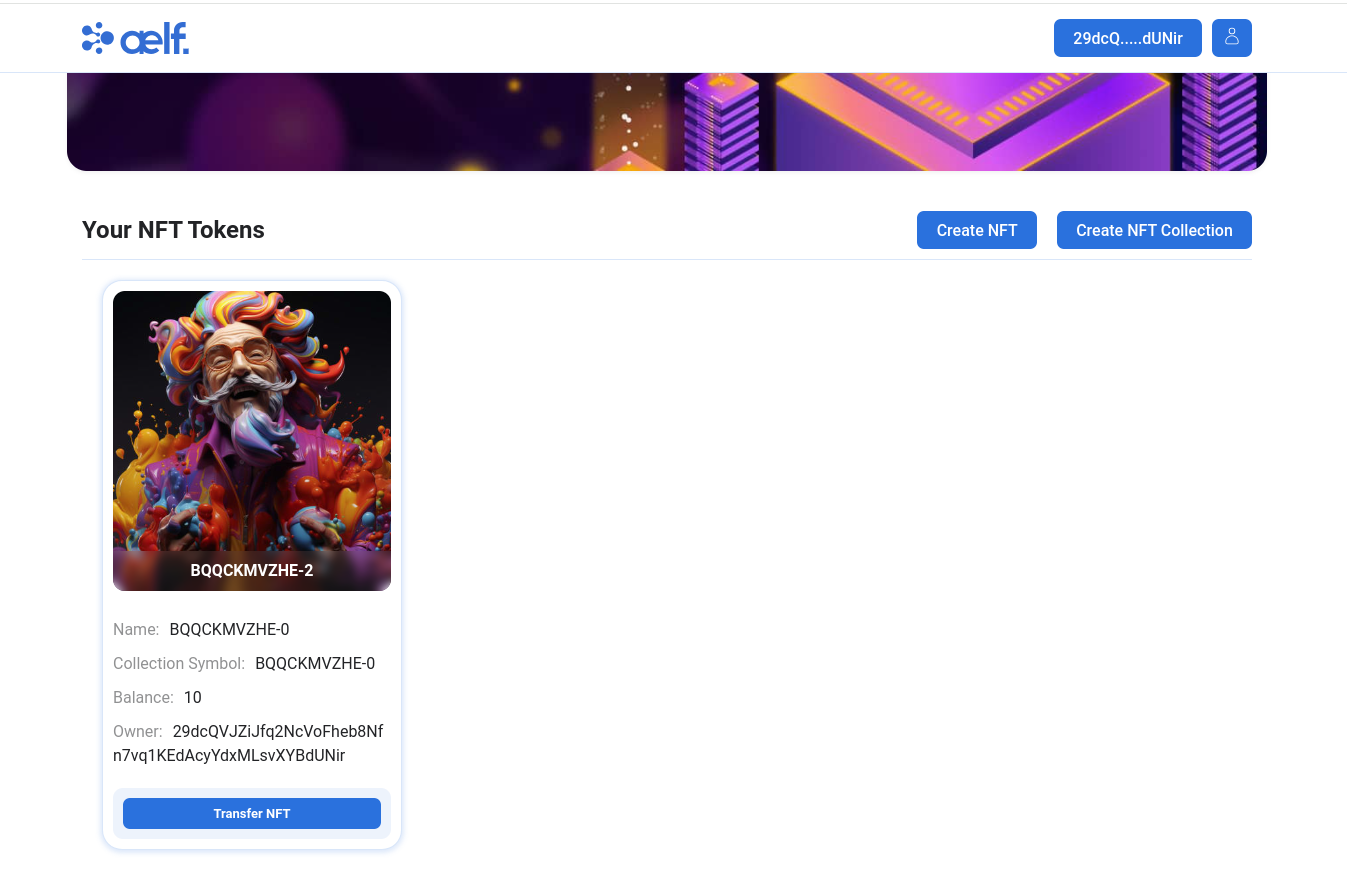
-
You will also able you access you NFT data on your Profile Page.

Transfer NFT Token
-
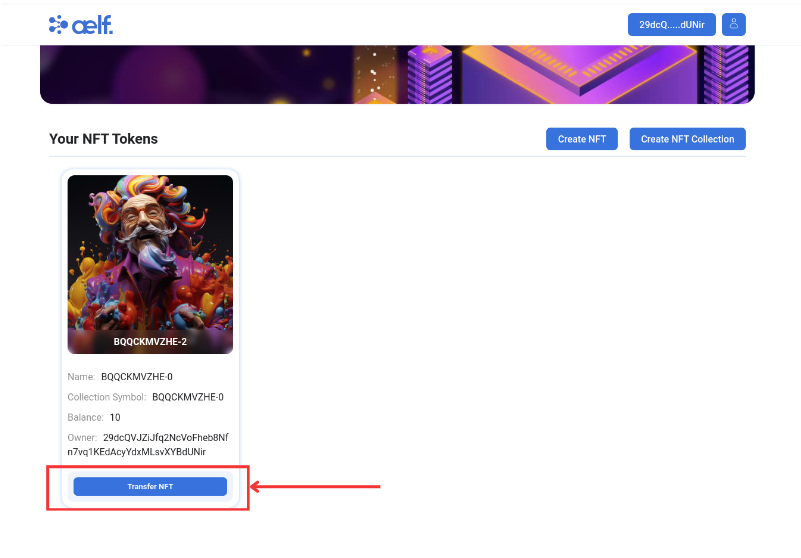
Once you get NFT in your account like above image then it's time to transfer NFT to another account.
-
Please Click on "Transfer NFT" Button.
-
Now you will be redirected to Transfer NFT page.
-
Please Fill all the Necessary Fields for Transfer NFT to another account like below image 👇.

-
Click on Transfer NFT button.
-
Your NFT Transfer Successfully to another account.
🎉 Congratulations Learners! You have successfully built your NFT dApp and this is no mean feat!
Step 4 - Interact with Deployed Multi-Token Smart Contract
For this NFT contract, you don't need to write a separate contract. Instead, you'll use an already deployed Multi-Token Contract with the following functions.
4.1 Creating an NFT Collection on MainChain
Open your terminal and run:
aelf-command send JRmBduh4nXWi1aXgdUsj5gJrzeZb2LxmrAbf7W99faZSvoAaE -a $WALLET_ADDRESS -p $WALLET_PASSWORD -e https://aelf-test-node.aelf.io Create
- Replace the placeholder values with your actual details.
ℹ️ Note: JRmBduh4nXWi1aXgdUsj5gJrzeZb2LxmrAbf7W99faZSvoAaE is the contract address of the Multi-Token Contract on aelf Testnet Mainchain.
4.2 Validate TokenInfoExist on MainChain
aelf-command send JRmBduh4nXWi1aXgdUsj5gJrzeZb2LxmrAbf7W99faZSvoAaE -a $WALLET_ADDRESS -p $WALLET_PASSWORD -e https://aelf-test-node.aelf.io ValidateTokenInfoExists
ℹ️ Note: transactionId Note down the trasnactionId from the above transaction will be used in step 3.
4.3 Create NFT Collection on dAppChain
ℹ️ Note: This step cannot be executed via the command line interface (CLI).
aelf-command send ASh2Wt7nSEmYqnGxPPzp4pnVDU4uhj1XW9Se5VeZcX2UDdyjx -a $WALLET_ADDRESS -p $WALLET_PASSWORD -e https://aelf-test-node.aelf.io CrossChainCreateToken
transactionBytes = Buffer.from(signedTx, "hex").toString("base64")
ℹ️ Note: Replace the placeholder values with your actual details.
ℹ️ Note: ASh2Wt7nSEmYqnGxPPzp4pnVDU4uhj1XW9Se5VeZcX2UDdyjx is the contract address of the Multi-Token Contract on aelf Testnet dAppChain.
4.4 Create NFT Token on MainChain
aelf-command send JRmBduh4nXWi1aXgdUsj5gJrzeZb2LxmrAbf7W99faZSvoAaE -a $WALLET_ADDRESS -p $WALLET_PASSWORD -e https://aelf-test-node.aelf.io Create
4.5 Validate Nft Token on MainChain
aelf-command send JRmBduh4nXWi1aXgdUsj5gJrzeZb2LxmrAbf7W99faZSvoAaE -a $WALLET_ADDRESS -p $WALLET_PASSWORD -e https://aelf-test-node.aelf.io ValidateTokenInfoExists
4.6 Create NFT Token on dAppChain
aelf-command send ASh2Wt7nSEmYqnGxPPzp4pnVDU4uhj1XW9Se5VeZcX2UDdyjx -a $WALLET_ADDRESS -p $WALLET_PASSWORD -e https://aelf-test-node.aelf.io CrossChainCreateToken
transactionBytes = Buffer.from(signedTx, "hex").toString("base64")
4.7 Issue NFT Token on dAppChain
aelf-command send ASh2Wt7nSEmYqnGxPPzp4pnVDU4uhj1XW9Se5VeZcX2UDdyjx -a $WALLET_ADDRESS -p $WALLET_PASSWORD -e https://aelf-test-node.aelf.io Issue
4.8 Transfer NFT
aelf-command send ASh2Wt7nSEmYqnGxPPzp4pnVDU4uhj1XW9Se5VeZcX2UDdyjx -a $WALLET_ADDRESS -p $WALLET_PASSWORD -e https://aelf-test-node.aelf.io Transfer
🎯 Conclusion
🎊 Congratulations on successfully setting up your development environment and interacting with your deployed smart contract! 🎊 You've laid a strong foundation for creating innovative applications on the aelf blockchain. 🌟
📚 What You've Learned
Throughout this section, you've acquired essential skills in:
-
🛠️ Setting Up Your Development Environment: You installed necessary tools like the .NET SDK, aelf contract templates, and the aelf deploy tool to prepare for smart contract development.
-
📦 Installing Node.js, Yarn, and aelf-command: These tools enable efficient interaction with the aelf blockchain, facilitating wallet creation and transaction management.
-
💡 Getting NFT Seed: You learned how to obtain an NFT seed from the NFT Faucet, a critical step for creating NFT collections.
-
🔧 Configuring Frontend Integration: You cloned a frontend project and configured it to connect with your smart contract, allowing for seamless user interaction with your dApp.
🔍 Final Output
By now, you should have:
-
📜 Successfully set up your development environment and installed all required packages.
-
💻 Configured your frontend to interact with the NFT smart contract, enabling functionalities like creating and transferring NFTs.
➡️ What's Next?
With a solid understanding of environment setup and contract interaction, you're ready to explore more advanced aspects of blockchain development. Consider delving into:
-
📊 Advanced Smart Contract Logic: Enhance your contracts with complex features and security measures.
-
🔒 Security Protocols: Implement robust security protocols to safeguard your applications and smart contracts.
-
🌐 Cross-Chain Interoperability: Explore how aelf facilitates communication between different blockchains, broadening your development capabilities.
Keep pushing the boundaries of blockchain technology with aelf. Your journey is just beginning, and the potential for innovation in decentralized applications is vast. 🚀
Happy coding and building on the aelf blockchain! 😊